I'm still waiting for my new rear tire to come in so I have slowly been taking more and more parts off of the bike and cleaning/polishing them. I finished polishing the gauges and I'm waiting for it to warm up a bit so I can paint the bracket that holds the gauges. I also had to buy some new rubber gaskets for them as the old ones had pretty much rotted away.
I cleaned up the rear shocks the other night while watching TV and I've started on the front wheel. I took the front brake apart and everything seems pretty good there. The previous owner must have recently replaced both sets of brake shoes. I took the front wheel bearings out to clean, inspect and repack them with grease but I found they did not turn very smoothly. Not like the rear ones at all. So, I went ahead and ordered a new set for $10. Hopefully I got the right ones.
I probably won't be updating this blog for a month or two since it is pretty cold now and I'll just be cleaning and polishing instead of riding. If anything humorous happens, I'll let you know about it.
Monday, December 22, 2008
Thursday, December 11, 2008
Speedo
When I bought Nixon, the rear tire had a substantial groove cut into the side of it, probably from rubbing against the fender when misaligned. I tried to buy a new tire this summer, but all of the suppliers were out, so I have been riding around on it. On my way home from work last Friday, it finally gave out. The tire split in the groove about a 1/4 of the way around the tire. Luckily, it has an inner tube so it did not blow and I was able to get home.....slowly. Oh yes, and the speedometer cable broke that day.
Since I can't ride it until I get a new tire, I decided to go ahead and disassemble the front end and clean it up. I somehow managed to get the frame balanced on a block of wood so I could get the front and rear wheels off. I also took the gauges off. I'm starting with the speedometer. It was kind of rattling around in the housing. It turns out that the two screws on the back that hold it tight to the housing were missing. I found two screws in my dad's box-o-screws that would work. The paint on the gauges is faded and chipped with lots of ugly touch-up paint so I started sanding them to get ready to repaint them. I noticed the metal underneath was bright shiny steel. So, I ended up sanding all of the paint off and polishing the steel. I figure if I don't like it, I can always paint them. I finished the speedometer last night after about 2 hours of sand paper, steel wool and metal polish. Now it is the tachometer's turn to get buffed.
Thursday, December 4, 2008
It's a Start
It has been too cold here to ride lately so I've been doing a little work on Nixon. I'm in the process of repairing the damage I did to the stock exhaust system I did when I tried to take it apart to clean it. I had to cut off a broken bolt and drill it out. I will have to get a new one welded in. I also tried to get one of the heat shield bolts out but have not yet succeeded.
When I bought the bike, the starter button that should have been in the right hand control housing was missing. A previous owner had wired up a cheap radio shack switch under the seat to activate the electric starter. I bought a new button and spring, but when I took the control apart, I realized that there was also a bracket in the housing that was missing. They don't sell that part separately, so I would have to buy a whole new control. Instead, I figured I would put my engineering talents to use and make one. When I was putting the new handlebars on, I took the bracket from the horn button on the left hand control and used it to figure out what the one for the starter button would have to look like. I made a paper template. Last night I used some aluminum sheet I got from a friend who is building an airplane to make a new bracket. I used my dremel tool to cut out the shape and then bent it into the proper form. I actually had to make three because the first two broke when I tried to bend them.
I got the button and bracket installed and reconnected the correct wires at the battery and tried it out. It worked! However, when I tried to put the control housing back on the bars, it wouldn't go on. I realized that all of the wires come out of the bars right where the bracket was. When it wasn't there, they had room. Now they hit the bracket. As I tried moving the wires around the wire to the starter button contact broke off.
I ended up grinding a good amount off of the bracket to try and clear the wires. I also had to solder the wire back onto the contact. After a lot of pushing and twisting, I managed to get the control back on and tightened down. I think the bracket is pushing on the wires, but there isn't much I can do about it. The new starter button works so I removed the old one from under the seat. Woohoo! That only took 2 1/2 hours.
Saturday, November 22, 2008
Shiver
The warm weather on Thursday fooled me into thinking it would be warm on Friday too. Nope, high of 44°! I made another attempt to ride around Donaldson Center again. This time I made it all the way without the bike dying. As I passed the golf course, I saw two of the guys from work that had left earlier to go play golf. I waved to them as I went by. They were right by the road so I turned around to say hi. I pulled up by them just of the rode and they were looking at me like I was crazy. After a couple of seconds, I realized I didn't know these guys. No wonder they thought I was nuts. I left feeling like an idiot.
When I left work to go home at 8:30, the temp had dropped to about 30°. When I tried to start the bike, it made a very weird noise, kind of like a goat screaming. Something I've never actually heard. I tried using the kickstart, thinking there was something wrong with the starter, but it still did it. I put it into gear and pushed it a little ways thinking the clutch may be stuck. I tried to start it again and it made the sound one more time and then it started. I let it warm up for about 2 minutes while I got cold. I don't really know what was wrong, but at least it started.
I rode home and decided that I needed some new gloves and some riding boots because my wrists and ankles were getting very cold. About half way home I noticed one of my front blinkers looked a little funny when I turned it on. I stopped at the next intersection and found that one of the turn signal lens screws had fallen out and the lens was hanging on for dear life. I couldn't feel my fingers so I decided it would just have to hang on until I got home.
Thursday, November 20, 2008
On The Catwalk
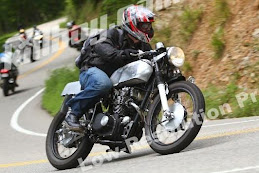
Since I got the bike back together last night and today is the warmest it is going to be for a few days, I rode her into work so she could pose for some pictures. I charged the battery over night, put some air in the tires and tightened a few bolts and screws in the morning. She seems to be running pretty well now. Those new jets must have done the trick. Here are some of my lame attempts to get artistic.
Cool Runnings
Everything went back together pretty smoothly last night. I got the cables lubed. That was a bit messy. I held a paper towel over the cable luber to catch the stuff the came out of the gaps. All the wires found their mates correctly the first time, so nothing fried. It was a little hard to work on the bike since it was about 40 degrees in the garage.
Wednesday, November 19, 2008
Ooooooo...Shiny
The new handlebars are almost done. Everything has been polished and the controls are mounted. The only things left to do are to reconnect all of the wiring and re-attach the cables. Since I have the cables off, I thought now would be a good time to lube them. One of my friends let me borrow his cable luber, so I will do it tonight. If all goes well, and I can figure out which wires go where, she should be ready to ride tomorrow!
Friday, November 14, 2008
Gone Fishing
Last night was spent performing the arduous task of fishing the hand control wires through the new bars. I knew it was going to be hard, but that sucked! I removed the old heat shrink from the wire bundles and re-wrapped them with electrical tape. I wrapped the big bundle for the right hand side in two separate bundles, thinking it would be easier to pull them through separately. WRONG! I ended up undoing all of that and wrapping them as one bundle.
I fed a nut through the bars that was tied to some dental floss. The floss was tied to some speaker wire. I then taped the speaker wire to the ends of the wire bundles. The left side with only 4 wires went through relatively easily. The right side with 9 wires......not so easy. In all, I made 5 attempts to pull it through. On all but the last one, the speaker wire would pull out of the wire bundle. On the third try, I was so close I could see the end of the wire bundle through the "exit" hole, but I couldn't grab it. The main problem was pulling the large bundle, that just barely fit in the tube, around the 90° corner of the clubmans.
But in the end, and after two dirty martinis, I got the wires through. Next week I will finish polishing the parts I took off and reassemble everything. I think I will borrow a camera and do a little photo shoot as well.
Thursday, November 13, 2008
Grindhouse
Last night I spent a couple hours putting holes in my new clubman bars to run the wires through. Who knew steel was so hard to cut through! I tried using a drill press, but since I had to lower the bit with one hand, I could only hold the bars with the other. I couldn't hold it steady enough. I tried putting it in a vice and using a cordless drill, but didn't make much progress. So, in desperation, I whipped out my trusty Dremel.
I used a heavy duty cut-off wheel to carve a square hole in the bars. Then I used a grinding wheel to make the ends round. The tubing used in the bars is much thicker than I was expecting for $18. The first hole I did was one of the ones at the hand controls. These get covered up by the controls so nobody can see how bad I butchered them. I used this first one to perfect my technique. The other two went much smoother now that I had a process. It still took a long time though. Finally, I used one of the small sanding drums for the Dremel to clean up the holes and remove all of the sharp edges. I will have to remember to coat the edges of the holes with something to keep them from rusting.
Tuesday, November 11, 2008
Christmas in November
The handlebars I ordered finally came in this weekend and the carburetor jets I bought finally arrived so I was able to do a little more work on Nixon last night.When I bought the bike, it had a 145 main jet on the LHS and a 130 main jet on the RHS. No wonder it ran kind of rough! After giving up on the Honda dealer, I found a guy online that had some extra jets from a jet kit that he bought to tune his bike. He sent me a pair of 135s, a pair of 140s, and a pair of 145s. Since the LHS was the side that kept fouling the plug, I put the 135s in. Unfortuantley, I'll have to wait until I get the bike back together to see if they help.
I also mocked-up the handlebars to see what position I wanted them in and to make sure they wouldn't hit anything. They fit great and I think they will look pretty cool. I marked them so that I would know where to put the holes for the wiring. Then I polished some more of the handlbar hardware.
Monday, November 10, 2008
The Beginning - Part 2
So I was watching Ebay and Craigslist everyday for something I could afford. Most of the stuff I could afford were being sold as parts bikes, and most of the stuff that ran, I couldn't afford. The other problem I had was when I was looking. It was the summer, and gas prices were high. What I was interested in was usually gone by the time I could go look at it. One weekend, I called a guy selling his bike for $600. By the time I got the kids in the car, borrowed my brother-in-laws truck and trailer and drove to the guy's house, he had already sold it.
As I waited for my bike to find me, what I was actually looking for became more clear. I didn't really want a cruiser type of bike. I couldn't afford a newer sport bike. I decided what I wanted was a "cafe racer". These are typically older Japanese bikes that have been modified somewhat to make them look (and sometimes ride) more sporty. Most of the ones I saw started out as old clunkers and were cleaned up with new handlebars and seats added. They usually have smaller displacemensts, 250 - 500 cc, just enough to hit 100 mph (The Ton). Well, I should be able to find an old, small Japanese clunker for $500 right? Something old enough to have a kickstart.
I started focusing in on a 1968-1975 honda CB350. They are small and nimble with enough power to hit the ton. They were the highest volume selling bike in history and they are often made into race bikes for vintage racing so parts are readily available. Lots of people have made them into cool little cafe bikes. Several of them popped up over the summer, but the owners either wanted too much for them in the condition they were in or they did not return my calls.
To be continued......
Thursday, November 6, 2008
I've Got Blisters on My Fingers
Tonight I started cleaning and polishing the handlebar hardware. I was surprised to find that the handlebar clamps are actually cast aluminum. They had been painted black but I thought they would look better polished next to the chrome bars. I also pulled the wiring out of the old handlebars, getting a blister in the process. The 35 year old plastic tubing around the wires is very stiff. I will probably have to rewrap them in order to feed them through the new bars. I also quickly cleaned and polished the old handlebars. Hopefully someone will buy them on Ebay.
The Rat's Nest
So far, the only modifications I have made to the bike are the parts that have fallen off. My goal is to convert it into a cafe racer style of bike. The first major thing that I am doing to accomplish this is to swap out the original handlebars for a set of clubman style bars like the ones below.
These are very low and actually go fwd, wrapping around the gauges before they pull back putting you in a much more hunched over, racing type of position.
I ordered the bars but they were on backorder for about a month. The dealer finally called to say they were in. When I went to pick them up, we realized that the distributor sent the wrong ones. Sigh. I guess a few more days won't kill me.
So last night, I removed the original handlebars in preparation to put the new ones on. Surprise! Most of the wires run inside the handlebars. I guess I should have realized this, but I just didn't think about it. So I spent about an hour, going through the rats nest of wires and connectors behind the headlight disconnecting all of the handlebar wires so I could take them off. I have a feeling that it will take even longer to get them all reconnected in the right order.
Grocery Getter
At dinner time last night, I headed to the store to do my grocery shopping. I always ride with a backpack that has some tools in it, so I just put my groceries in there. I don't buy much. On the way there, the left cylinder kept dieing. I figured the plug was getting fouled again. Also, I noticed that my turn signals had stopped blinking. After leaving the store, I stopped at Advance Auto. I bought an electronic flasher, a couple spark plugs, a spark plug wrench that fit in the toolbox on the bike, and some dielectric grease. I had to borrow a wrench to get the old plug out because the new one didn't have that much leverage. I also replaced the flasher.
I also noticed that the taillight was not on. Taking the lens off, I saw that two of the three screws holding it on had fallen out. I checked the bulb which was fine. I found out later that one of the wiring connectors had come loose. So I put everything back together and headed back to work.
But, the left cylinder kept dying. Hmm, that's a brand new plug. What gives? For some reason I tried switching the fuel valve to reserve. A couple seconds later, it was fine. Apparently, when the gas is low, it does not flow to the left carb as well since it is further from the valve.
I made it back to work ok and made it home. I must remember to fill it up next time.
Donaldson Center
So after this weekend's valve clearance adjustment, timing adjustment, new left spark plug and carburetor re-sync, she seemed to be running pretty well. It was a nice day yesterday so I decided to ride her into work so I could go on a nice ride at lunch. I headed out to Donaldson Center and made one loop around the perimeter road. That was pretty enjoyable so I decided to make another loop around in the opposite direction. A 1/4 mile down the road, the bike lost all electrical power. I stopped and lifted the seat to discover I had forgotten to put the battery cover back on after charging it the night before. I replaced it and the bike fired right up.
Another mile down the road, it died again. After sitting for 30 seconds, it came back to life. It did this several more times as I tried fiddling with the ignition and some other things. Then, it wouldn't come back. A nice guy on a black Hyabusa stopped to see if I needed any help. I replaced the fuse and it came back on, so he left. As soon as I hit the street again, it died. I finally figured out that the fuse was loose in its holder. I tried tightening up the clips in the holder and that seemed to fix it.....for now.
Wednesday, November 5, 2008
The Beginning
I'm not really sure what your are supposed to put in your first blog post. I guess I should just give a little background as to why I'm doing this.
In the summer of '08, I really had the urge to ride a motorcycle again.
In high school and college, I had a 1981 Honda CB400 that I had bought for $500. I really liked riding it. When I moved to Atlanta, I didn't want to ride it in all of that traffic, so it sat for 2 years until I sold it, for $500.
So, since I was back working in SC where there isn't much traffic, I set out to find another bike. My wonderful wife finally gave in to my incessant pleading and said, "Fine, but you can only use YOUR money, not OURS." That means I would have to use my birthday and Christmas money, which when you are an adult, doesn't come in by the truckload. The most I could muster was about $500 after Christmas and asking everyone to just give me money for my birthday.
Now, the quality of bikes that you can buy for $500 is not very good. In fact, it is pretty rare that you can find anything that is actually running. So, I started watching Ebay and Craigslist every day to see what would pop up.
To be continued....
Subscribe to:
Posts (Atom)